Imagine the rich, velvety texture, the subtle hint of cocoa, and the tangy embrace of cream cheese frosting. Now, picture all of that in a perfectly portioned cake that satisfies your craving without overwhelming your fridge with leftovers. This is the magic of an easy 6-inch red velvet cake. Forget the intimidating multi-tiered giants; this mini masterpiece is designed for intimate celebrations, spontaneous dessert cravings, or simply a treat for a Small Red Velvet Cake: Perfect for Birthdays & Valentine's Day special occasion without the commitment of a full-sized dessert.
Red velvet cake holds a special place in the hearts of many, revered for its striking appearance and unique flavor profile. Traditionally, baking a red velvet cake might seem like a grand undertaking. However, scaling it down to a 6-inch size makes it incredibly approachable, yielding 4-6 generous slices – just enough for a small household or a delightful gathering. This isn't just a reduced-size cake; it's a testament to enjoying high-quality, freshly baked goods without waste, proving that sometimes, smaller is indeed sweeter.
Why a Small Red Velvet Cake is Your Next Baking Obsession
There's a unique satisfaction that comes with baking, and even more so when the result is perfectly tailored to your needs. A small red velvet cake is more than just a convenient size; it's a game-changer for home bakers. For starters, it eliminates the dreaded "cake fatigue" that often comes with a larger dessert lingering in the kitchen for days. This 6-inch wonder is ideal for couples celebrating an anniversary, a small family birthday, or even a cozy Valentine's Day dinner where a grand gesture is made with a perfectly sized treat.
Beyond portion control, baking a smaller cake means less time in the kitchen and fewer ingredients, making it an economically smart choice. It's less intimidating for beginner bakers, offering an opportunity to hone skills without the pressure of a large-scale project. You can experiment with decorating techniques, perfect your frosting consistency, and discover the joy of creating something beautiful and delicious without feeling overwhelmed. Furthermore, the quick turnaround from oven to table means you can enjoy the ultimate freshness and tenderness that only a recently baked cake can offer. It’s about celebrating the moment, savoring every bite, and knowing you’ve created something truly special, perfectly suited to the occasion.
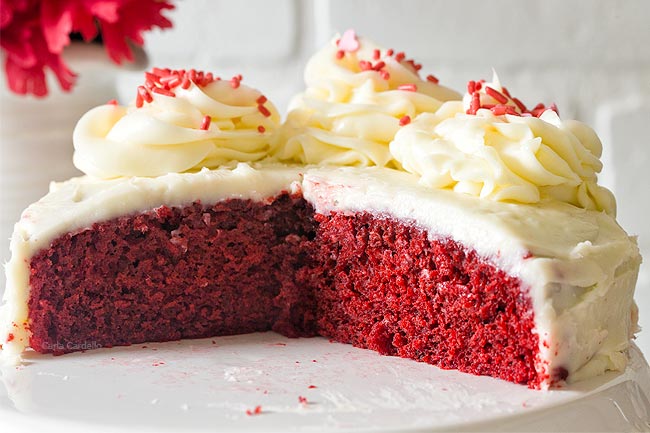
Unlocking the Signature Flavor and Velvety Texture of Your 6-inch Red Velvet
The allure of red velvet lies in its distinctive characteristics: a striking crimson hue, a delicate chocolate whisper, a subtle tang, and most importantly, an unbelievably tender, velvety crumb. Achieving this perfect balance in your 6-inch red velvet cake isn't just about following a recipe; it's about understanding the science and technique behind it.
The Subtle Symphony of Flavors
- Hint of Chocolate: Unlike a traditional chocolate cake, red velvet contains just enough cocoa powder (often a small amount) to provide a nuanced, mild chocolate flavor that complements rather than dominates. Using Dutch-processed cocoa powder can enhance the red hue and offer a slightly richer, smoother chocolate note.
- Tangy Buttermilk: Buttermilk is a cornerstone ingredient, lending both moisture and a crucial tangy counterpoint to the sweetness. Its acidity also reacts with baking soda to create lift and contributes to the cake's tender structure.
- Vanilla's Sweetness: Good quality vanilla extract ties all the flavors together, providing a warm, sweet undertone that makes each bite irresistible.
Achieving the Velvety Crumb: The Reverse Creaming Method
One of the best-kept secrets for an exceptionally tender and moist small red velvet cake is the reverse creaming method. While traditional creaming starts with butter and sugar, this technique begins differently, resulting in a cake that lives up to its "velvet" name. Here's how it works and why it's so effective:
- Dry Ingredients First: All dry ingredients, including flour, sugar, cocoa powder, baking soda, and salt, are combined first.
- Butter Integration: Cubed, room-temperature butter is then added to the dry mixture and beaten until it resembles coarse crumbs. This step coats the flour particles with fat, which is key to preventing excessive gluten development.
- Liquid Addition: Finally, the wet ingredients (buttermilk, eggs, vanilla, food coloring) are gradually incorporated.
By coating the flour in butter from the outset, you significantly reduce the formation of gluten. Over-developed gluten can lead to a tough or chewy cake, but the reverse creaming method ensures a soft, tender crumb that practically melts in your mouth. It's a remarkably forgiving method, perfect for ensuring your mini red velvet cake has that sought-after delicate, velvety texture every single time. For more in-depth insights into perfecting this technique, check out our guide on Achieve Velvety Crumb: Small Red Velvet Cake Secrets Revealed.
Essential Ingredients and Smart Swaps for Your Mini Red Velvet
Creating an easy 6-inch red velvet cake from scratch doesn't require a pantry full of exotic items. Many of the ingredients are staples, but understanding their roles and potential substitutions can elevate your baking game.
Key Ingredients You'll Need:
- All-Purpose Flour: The foundation of your cake. Sifting it ensures a lighter crumb.
- Granulated Sugar: Provides sweetness and helps with moisture.
- Unsweetened Cocoa Powder: For that subtle chocolate flavor. While natural cocoa works, Dutch-processed cocoa can yield a darker, richer color and slightly less acidic taste, which can enhance the red. Avoid sweetened cocoa.
- Red Food Coloring: Essential for the iconic vibrant red. Gel food coloring is often preferred over liquid for its concentrated pigment, meaning you need less to achieve a deep color without adding excess moisture.
- Buttermilk: Crucial for moisture, tenderness, and tang. If you don't have buttermilk, you can make a quick substitute: add 1 tablespoon of lemon juice or white vinegar to a liquid measuring cup, then fill with regular milk to the 1-cup line. Let it sit for 5-10 minutes until it slightly curdles.
- Baking Soda and White Vinegar: The classic leavening agents in red velvet. The vinegar reacts with the baking soda and the acidity of the buttermilk to produce carbon dioxide, giving the cake its lift and contributing to its airy texture.
- Unsalted Butter: Provides richness and contributes to the cake's structure. Ensure it's at a cool room temperature if using the reverse creaming method.
- Large Eggs: Bind the ingredients, add moisture, and contribute to the cake's structure and richness. Room temperature eggs emulsify better.
- Vanilla Extract: Enhances the overall flavor profile. Use good quality pure vanilla for the best results.
The Unbeatable Cream Cheese Frosting
A small red velvet cake is simply incomplete without its signature cream cheese frosting. This tangy, sweet, and incredibly creamy topping is the perfect partner to the cake's subtle flavors. For a stable and luscious frosting:
- Use full-fat brick-style cream cheese, thoroughly chilled, and good quality butter, softened to room temperature.
- Sift your powdered sugar to avoid lumps.
- Beat the butter and cream cheese together until smooth before gradually adding the powdered sugar and vanilla. Don't overmix, or your frosting might become too soft.
Tips for Baking and Decorating Your Perfect 6-inch Red Velvet Cake
Baking a small red velvet cake is a delightful process, and with a few key tips, you can ensure a flawless outcome from start to finish. From preparation to the final flourish, these insights will help you achieve a moist, flavorful cake that looks as good as it tastes.
Flawless Baking Starts Here:
- Pan Preparation is Key: For a 6-inch round cake pan, grease it thoroughly with butter or non-stick spray, then dust it with flour or cocoa powder. For extra insurance, line the bottom with a parchment paper circle. This prevents sticking and ensures your beautiful cake releases easily.
- Room Temperature Ingredients: This is a golden rule in baking, especially for the reverse creaming method. Room temperature butter, eggs, and buttermilk emulsify more effectively, leading to a smoother batter and a finer crumb.
- Don't Overmix: Once you add the wet ingredients, mix only until just combined. Overmixing develops gluten, which can lead to a tough cake, counteracting the benefits of the reverse creaming method.
- Mind the Oven: Preheat your oven completely before placing the cake inside. Avoid opening the oven door too frequently during baking, as this can cause the cake to sink. Test for doneness by gently pressing the top (it should spring back) or inserting a toothpick into the center (it should come out with moist crumbs, but not wet batter).
- Cool Completely: Resist the urge to frost a warm cake! Let your cake layers cool completely on a wire rack before attempting to frost them. Warm cake will melt your beautiful cream cheese frosting, leading to a messy outcome.
Decorating Your Mini Masterpiece:
- The Crumb Coat: This is an essential step for a neat finish. Apply a thin layer of frosting all over the cooled cake layers to trap any loose crumbs. Chill the cake for 15-20 minutes, then apply your final, thicker layer of frosting.
- Simple Elegance: A small red velvet cake doesn't need elaborate decorations. A smooth, even layer of cream cheese frosting is classic. For a rustic touch, use an offset spatula to create gentle swirls on top.
- Garnish for Impact: Enhance the visual appeal with minimal effort. A sprinkle of leftover red velvet crumbs (if you trim the cake), a dusting of cocoa powder, white chocolate shavings, or a few fresh raspberries can elevate your cake's presentation.
With these tips, your easy 6-inch red velvet cake will not only be moist and flavorful but also beautifully presented, making it a truly unforgettable dessert.
The charm of an easy 6-inch red velvet cake lies in its ability to deliver all the beloved qualities of a classic red velvet – the tender crumb, the subtle chocolate-vanilla notes, the tangy cream cheese frosting – in a perfectly manageable and utterly satisfying size. It’s the ideal solution for intimate celebrations, a delightful weekend project, or simply when you desire a slice of homemade luxury without the burden of excessive leftovers. By embracing smart baking techniques like the reverse creaming method and understanding the interplay of key ingredients, you can effortlessly create a moist, flavorful, and visually stunning dessert that brings joy to any occasion. So go ahead, whip up this mini red velvet cake and experience the joy of perfectly portioned indulgence that truly leaves no sweet tooth unsatisfied.
